JAPAN PLANNING GUIDE
How to Buy an eSIM for Japan Before You Travel
Last updated: 2026-09-01
Buying an eSIM for Japan is usually straightforward when your phone is compatible and unlocked. Before you pay, check your device, choose a plan that matches your trip, and understand when its data period starts. This guide walks through how to buy, install, and activate a travel eSIM without changing your usual phone number unnecessarily.
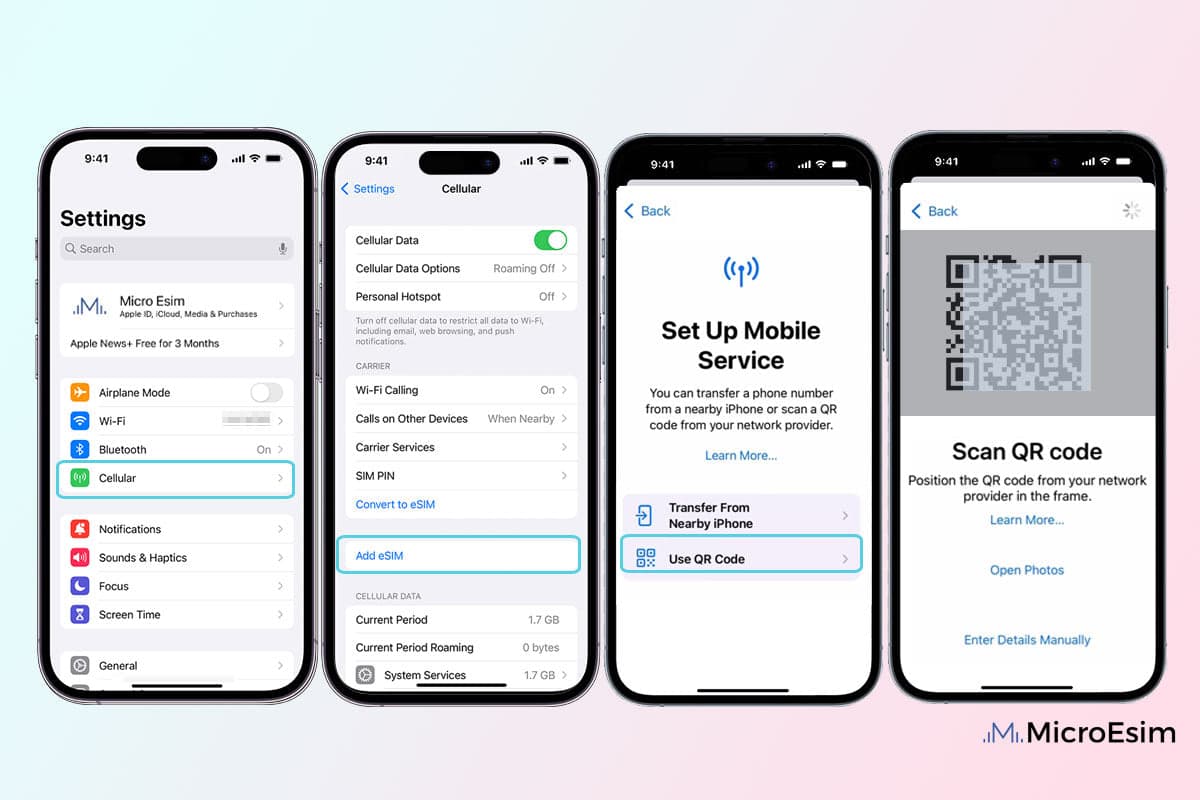
The buying and setup flow at a glance
| Step | What to do | What to check |
|---|---|---|
| Check device compatibility | Look up the exact model number in Settings or on the manufacturer's support site. | The model must list eSIM or an EID number, not just dual SIM. |
| Unlock the phone | Call or message your home carrier and ask to confirm the unlock status. | Confirm the unlock is permanent, not a temporary travel or soft unlock. |
| Buy online | Use the provider's official website or app, pick Japan, and choose data and duration. | Save the QR code or activation code offline, not only inside the email. |
| Install on WiFi | On the phone, go to Settings, then Cellular or Mobile Data, then Add eSIM, and scan the QR. | Keep your home line active and label the new line clearly, for example Japan data. |
| Activate on landing | Turn on the travel eSIM and enable data roaming for that line only, then set it as the data line. | Leave your main line's call and text settings unchanged unless your carrier confirms otherwise. |
| Test before leaving the airport | Open a map, a messaging app, or a search page using mobile data. | Confirm pages load over the Japan line and that calls and SMS still go through your usual number. |
Before you buy: check that your phone can use an eSIM
Look up the exact model of your phone on the manufacturer's support site, then check with your current carrier that it is unlocked. A travel eSIM often supplies mobile data only, rather than a Japanese number for normal calls and SMS. If you need to receive calls or texts on your home number, plan to keep that line active according to your carrier's roaming terms.
Choose an eSIM plan for your Japan trip
Start with the length of your trip and how you expect to use data. Compare the allowance, plan duration, network information, hotspot policy, top-up availability, speed policy, and refund terms. A Japan-only plan may be simpler for one destination; a regional plan can make sense if Japan is one stop on a longer trip. Check the provider's current details before purchasing, because plans and conditions can change.
How to buy an eSIM for Japan
Use a provider's official website or app, select Japan or the region you need, then choose the data amount and duration that fit your trip. Read the compatibility and activation details before checkout. After buying, save the confirmation and QR code or app instructions in a place you can access without mobile data. Breeze and Airalo are two options listed below; compare their current plan terms rather than assuming one service will suit every trip.
Install the eSIM before departure
Install your eSIM while you have stable WiFi, following the provider's own instructions. Give the new line a clear label, such as Japan data, so you can identify it later. Do not delete the profile after installation unless the provider instructs you to do so. Installation and activation are not always the same event, so check the plan's timing rules before switching it on.
Activate and test it when you arrive in Japan
When you reach Japan, follow the provider's instructions to turn on the travel eSIM and select it for mobile data. Some providers require data roaming on the travel line, while settings vary by plan and phone. Keep your main line's call and text settings unchanged unless you have confirmed the effects with your carrier. Test maps or a message before leaving your arrival WiFi, and keep a screenshot of the setup steps as a backup.
Can you buy an eSIM after arriving in Japan?
Often you can buy one after arrival if you have working WiFi, but this can add friction when you are tired or need directions immediately. Preparing the purchase and installation before departure usually makes arrival easier. If an eSIM is not right for your phone, a physical SIM, pocket WiFi, or your home carrier's roaming option may be a better fit.
What to do if the eSIM fails to install
A failed install usually has a simple cause. The most common fixes are: re-scan the QR code from your confirmation email rather than a screenshot, restart the phone, and check that you are on a stable WiFi network while installing. If the provider's app offers a manual activation code, try entering the SM-DP+ address and code instead of scanning. When the same eSIM will not install on a second device, the QR has usually been consumed and you will need a fresh one from the provider's support. If the line installs but shows no service, confirm that data roaming is enabled for the travel line and that the right line is selected for mobile data.
If your home carrier's eSIM profile is full
Phones only store a limited number of eSIM profiles, so a phone that has been used for travel before can run out of slots. On iPhone XS and later you can store multiple eSIMs, with iPhone 13 and later able to keep two eSIMs active at once alongside a physical SIM. If your phone refuses a new install because the profile list is full, open Settings, review your stored eSIMs, and remove the ones you no longer need before installing the new plan. The provider does not see your stored profiles, so removing an old eSIM does not affect any active plan you want to keep.
Quick checklist before you fly
- Confirm your exact phone model supports eSIM.
- Confirm your phone is unlocked for another carrier.
- Check whether you need calls or SMS on your usual number.
- Choose data and duration based on your trip and usage.
- Read the provider's activation, hotspot, and refund rules.
- Install the eSIM on reliable WiFi and save the instructions offline.
Related guide
Decide which connection option is the best fit before you buy.
Compare current Japan eSIM plans
Open both official plan pages and compare the data allowance, duration, hotspot policy, and current price for your trip.
Advertisement: MORISTACK may receive a commission if you book through this link.
Useful resources
Advertisement: MORISTACK may receive a commission if you book through this link.
Need a Japanese phone call?
For a specific confirmation or change with a Japanese business, use the separate MORISTACK Phone Call Service.
Visit call.moristack.com →MORISTACK ではこう解決できる
If a phone call would solve it faster
For any of the situations covered in this guide (hotel, restaurant, ryokan, city office, clinic), MORISTACK Call places the call for you in Japanese and reports the answer back in English — from $6 for a single call.
Phone call, made for you
MORISTACK Call
A bilingual operator calls a Japanese business on your behalf and reports back in English. Single calls, restaurant bookings, ryokan confirmations, city-office enquiries.
See MORISTACK Call →The company hub
moristack.com
Overview of all MORISTACK services — what we ship today, what's in progress, and how to get in touch.
Visit moristack.com ↗